Showing posts with label Recipes. Show all posts

Monday, August 30, 2010

Magic Mix

Awhile ago a friend mentioned Magic Mix on her blog and I decided to try it.

It is amazing stuff.

I am totally in love with it.


To make it all you have to do is mix together:

2 1/3 C. Powdered Milk
1 C. All Purpose Flour (Yes, use All Purpose)
1 C. (2 sticks) Margarine (***HAS TO BE REAL MARGARINE, NOT SPREAD***) or Butter, at room temperature

To see more in-depth instructions on how to make it you can go here.

It may sound simple but you can use it in so many things.
I made a batch a few weeks ago and and have been keeping it my fridge. I've used it to make making white sauces and cheese sauces and not only can I now make them super fast but they turn out beautiful every time. Which is definitely MAGIC to a girl who is famous for making watery cheese sauce.

I also tried the recipe for chocolate pudding and it was super tasty. Jon liked it better than the box mix.

I especially like it because I am trying to cut back on the amount of processed foods my family eats and with the Magic Mix I can make things that I wouldn't have ever dared to before. Like Cream of Chicken Soup! So easy.

I think that I am going to stop investing in buying cases of cream of chicken soup for my food storage and instead spend the money on a big bag of powdered milk.

You should try this stuff.

It really is magic.

Friday, February 12, 2010

Bread Making Tips

Ever since Jon and I got married I've been trying to learn how to make good wheat bread. To say the least... it has been an adventure. We've eaten more dense wheat bricks over the last four years than we have moist, delicious slices of bread. But I'm getting better... much better.

My Dad's new wife is a really good bread maker and over Christmas I watched her make bread. I've discovered that you really have to watch someone make bread to learn how they do it because invariably they don't always follow the recipe or they do something important that they won't ever tell you. Anyway, after her lesson my bread has been turning out so wonderful. I still have a lot to learn about 1,000 more loaves of bread to make before I feel like an expert but I thought I'd share with you some of the things she taught me (or that I've learned from my grandma who is also an bread baker extraordinaire) that have made a big difference in my bread making. Please feel free to add any other tips that you have!

1) Keep your yeast in the freezer and only use SAF yeast. This is the best type of yeast and it keeps longer and best in the freezer not the fridge.

2) Start your bread by adding your warm water, 3 cups of flour, and your yeast. Mix it together on low till it makes a slurry. You can also add in the honey/sugar and oil now too if you want. The slurry seems to make the yeast activate well and I've noticed that if I skip this step my bread won't rise very high.

3) After you have all the ingredients mixed in, except the flour, start the mixer on low and then SLOWLY add the rest of the flour. Don't turn the mixer up to high until you've added quite a bit of flour. The slow setting stretches the gluten fibers in the wheat resulting in moist fluffy bread. When you can tell that your machine is having a hard time mixing it and you can see the gluten fibers stretching then turn it up to high and continue adding the flour slowly.

4) Don't ever follow the recipe to determine how much flour to put in. Just keep adding flour slowly until the dough pulls away from the sides of the bowl. You want enough flour to clean the sides off but not so much that your dough isn't sticky.

5) Let the dough mix on high for 10 min. Don't worry if your dough is semi-sticky because during this ten minuets it will start to get less sticky. If it is still really sticky after five minutes of mixing add a little bit more flour.

6) Don't add your dough enhancer until after all your flour is added and your dough has been kneading for at least 5 minutes. You want to make sure your gluten fibers are good and activated before you add the enhancer.

7) Heat up your oven to about 175 degrees (or just warmish) and then turn it off. Stick your loaves in there to rise. After they have risen leave them in the oven while you heat it up to 350 degrees-- don't count on them rising more once you've heated up the oven because sometimes they do and sometimes they don't. Also if you start the bread in a cold oven you'll need to cook it for five minutes longer than the recipe calls for.

8) Eat at least one slice of bread, preferably with butter and honey, immediately after it comes out of the oven.... oooh, yum!

Okay so there are all my bread making hints. They have made a big difference for me but I know that bread making differs at every elevation and temperature so you might have to experiment to find out what works for you. My dad's wife also suggested taking a bread making class at your local Bosch store which I think would be a great idea because you really have to see bread made well to learn how to make it.


Hmm.. perhaps I should have got a better picture.
I took this picture of the bread a few days after I made it and it had gotten a little squished on top.
So use your imagination and picture it super fresh and steamy.


Here is my favorite bread recipe that I got from my Grandma. It is half white and half wheat and even though I really like whole wheat bread this is by far my favorite because it is usually really moist and light.

My Grandma's Half and Half bread

2 1/2 cups warm water
1 TBSP salt
1/4 cup vegetable oil or applesauce
1/4 cup honey
1 TBSP dough enhancer
1 1/2 TBSP gluten flour
1 TBSP yeast
3 cups white bread flour (not just white flour but BREAD flour-- it really does make a difference)
3 cups whole wheat flour (may need more to get to right consistency)

Let rise for 30 min and bake at 350 degrees for 30 mins.

Friday, August 07, 2009

Ratatouille


I am in a recipe sharing mood and wanted to share this recipe for ratatouille because when I made it on Monday for dinner it brought back good memories and made me happy. I realized that the last time I made this dish was about this time two years ago and I was about 3 or 4 months pregnant with Asher. I was just getting over the "sick phase" of pregnancy and wanted to make something special for dinner (the top picture is the actual dinner I made, don't ask me why I took a picture of it!). The best thing about ratatouille is that about this time of year, give or take a few weeks depending on where you live, ALL the ingredients can come fresh out of your garden-- tomatoes, green peppers, onions, zucchini, eggplant and basil. It is always fun to make things from what you've grown in your garden, and I really don't think there is really anything more satisfying than eating a dish made completely (or almost completely) out of things that you have grown yourself. I should admit that this time I bought the tomatoes and the green peppers because mine are still too small. But even if you buy all the ingredients (because really how many people usually grow eggplant-- unless you are like me and wanted eggplant so you can make ratatouille) it is still a wonderful and incredibly easy dish. Besides I heard an old wives tale once that said eggplant is suppose to help induce labor... hmmm... maybe I'll have to make it again soon :)

Tuesday, August 04, 2009

Homemade Yogurt


I hope by now you have all become masters at the art of homemade granola and are ready to move on to the slightly more advanced skill of homemade yogurt making. While you can't really mess up granola, yogurt on the other hand has been a bit harder for Jon and I to master. You really have to make sure the temperatures are right and that you don't bump it or bother it while it is setting up. We used to make it on the stove and usually only about half of our attempts would set up. The others would end up as what is affectionately called "yogurt milk" at our house. It is actually still pretty good to eat on your granola-- it is just sugary flavored milk. And there is one infamous batch of yogurt which will be forever remembered as the "jello yogurt"... Jon tried putting Jello in instead of a packet of Gelatin-- it doesn't work very well just so you know. Anyway, I just discovered how to make yogurt in the crockpot and while it takes more time (it isn't labor intensive, you just have to let it sit longer) the yogurt has come out PERFECT every time and you don't have to add gelatin (which makes it cheaper). This yogurt is usually a little runnier than the type you get in the store --which is perfect for pouring over granola-- but if you want it to be more like the store types you can add gelatin.

Here is the link to the crockpot yogurt recipe I use. I usually add a cup of sugar and a teaspoon of vanilla because I don't like plain yogurt. If you want to have fruity yogurt you just put the fruit on the bottom of the container that you store the yogurt in and then stir it up before you eat it. You can also mix jam or jelly into your yogurt to flavor it and that tastes really good. I did that every morning at breakfast when we were in Jordan and the Arabs thought I was really crazy, not to mention that I poured it over my corn flakes... I guess that isn't how you are suppose to eat Arabic yogurt :)

Also, here is a link to how to make it on the stove and in the oven, and here is how to make it in the microwave (I haven't tried that one yet, but our friend does it and he says it turns out fairly good). But these ways are a bit harder than the crockpot because you really have to keep track of the temperatures.


Making your own yogurt is SIGNIFICANTLY cheaper than buying it. I use about 3/4th of a gallon of milk (cost: abt $1.50) and the crockpot recipe fills 3 of the big 32 oz yogurt containers. I just save the containers from when I buy yogurt and then reuse them for my homemade yogurt. And since it doesn't cost as much you won't feel guilty eating this every morning for breakfast!


Ooh, yummy. Maybe I'll go have some right now.

Thursday, July 30, 2009

Homemade Granola


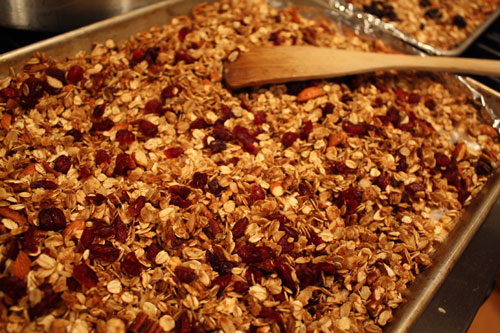
I am a granola and yogurt addict. I'll admit it with glee. I love it, all of it. I think that it might just be my favorite thing to eat... with fresh raspberries on top... oh joy... oh rapture... But the only problem about granola and yogurt is that it is super expensive, especially when you are addicted and want to eat it for breakfast EVERY morning. The average box of granola at the store costs about $5 and the amount inside is only enough to last a good granola addict like myself about two days... at the max. Yogurt isn't much cheaper, costing about $3 for a 32 oz size (which in our house literally only lasts a day).

So, it wasn't long after Jon and I were married we realized that in order to afford my granola and yogurt addiction on a poor student's budget we would have to learn how to make it ourselves... and we have. We've never really used a recipe, we've just experimented. Over the years some of the experiments turned out fantastic while others went straight into the garbage can (well, in reality it never actually made it to the garbage because Jon will eat ANYTHING, literally... even totally burnt granola). Some of my favorite memories of our early marriage are of Jon and I making granola together in our teeny tiny yellow kitchen and arguing over who was really to blame for letting it burn. For the first year of our marriage I think we ate some form of granola and yogurt EVERY morning. Granola making is still something we LOVE to do together and I am happy to report that now we hardly ever argue over who burns it.

I thought I'd share my favorite recipe for granola. I have to admit that I never really measure anything I just put in what looks good and the batches turn out different every time. I've tried to make a guess at what I think I usually put in, but feel free to experiment... that is half the fun.


Heathon's Homemade Granola

In a BIG bowl or pot mix these dry ingredients together:

10 cups oats ( I like rolled oats better than quick oats-- they taste MUCH better and are healthier for you)

1 cup wheat germ ( you can also used oat germ or ground flax seed or anything else healthy and powdery)

1 cup whole wheat flour (you could really use any type of flour... you just need something powdery to help hold the granola together)

2 bags of coconut (one would probably be fine, I just really like coconut)

You can add anything else you like... corn flakes, rice crispies (sometimes I buy the little bags of rice puffs... Jon calls them "maggots"... and put those in), sunflower seeds, sesame seeds, cinnamon, almonds, peanuts, any other type of nut. One of Jon's and my favorites is apricot seeds (the seed inside the pit of an apricot) they taste like almonds but are fruity. They are REALLY good in granola, but we only get them a few times a year.

You can also add things like raisins and dried fruit but I like to wait till after I've baked the granola to add the raisins because sometimes they get burned or really dried out when you bake them. But go ahead and experiment and you can decide how you like it.

In a separate bowl mix these wet ingredients together:

2 cups of water

1 cup brown sugar ( you can also use honey, maple syrup, or another type of sweetener... and if you want it sweeter just add more-- I don't like it too sweet)

2 tsp vanilla

or

1 tsp maple extract

or

1 tsp cloves, 1 Tbsp cinnamon and 1/2 tsp lemon juice

depending on how you want it to taste.

Mix them together till the brown sugar dissolves and then gradually pour it over the dry ingredients. Make sure you mix it really well before you add more of the water so that your clumps don't get too big. I like to have the granola really loose with only a few small clumps so I try not to let it get too wet (it also takes longer too cook if it is really wet). If it starts to get too wet and your clumps are really big you can add more oats and flour to help loosen it up.

Spoon on to ungreased cookie sheets and spread it out so it is not too thick. Cook for 30 min at 300 degrees. All ovens are different so you might have to play around with the time and temperature. It turns out best if you cook it at a low temperature for a long time rather than a high temperature for a short time. If you start to smell the granola then you know that it almost done. The granola will still be a little "wet" when you take it out of the oven but when it dries it will harden up. If it doesn't harden up after sitting on the counter for about 20 min stick it back in for a little while. Don't forget to stir it and break it up with a spatula RIGHT when it comes out of the oven or else it will dry into one big granola bar.


Speaking of granola bars, if you want to make granola bars just add more water to the recipe and then pack the wet granola into a cake pan. If you make them thicker they will be chewy and if you pack it thinner then they will be crunchy. They need to be cooked for about twice as long as normal granola (abt an hour at 300 degrees). We like to add peanut butter and chocolate chips to our granola bars.

Granola is remarkably easy and you can't really mess it up unless you burn it. I haven't ever calculated how much it costs to make but I am sure that it is MUCH cheaper than buying it. This recipe makes about 20 cups or more of granola, which is easily the equivalent of three or four of the small boxes you get at the store. Not to mention that almost all the types of granola you buy at the store (even the type you can get in bulk at the health food store) are packed with sugar. When you make your own you can control how sugary it is and put healthy things like flax seed into it.

I make a batch of granola about once a week and it usually lasts Jon, Asher and I the whole week. It is best when eaten with homemade yogurt, but since this post is already really long I'll post the recipe for homemade yogurt in another post (maybe tomorrow?).

Wednesday, March 18, 2009

What To Make With Cabbage?

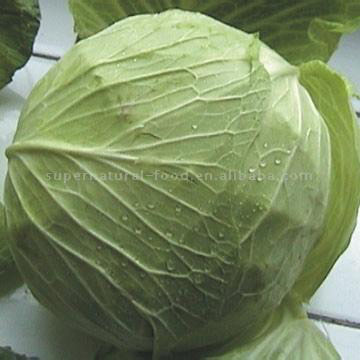
So I have a lot of cabbage and don't know what to do with it. It was on super sale at the grocery store so I bought a head of it, and then my in-laws brought us over a big head of it with a corned beef to cook up for St. Patty's Day. I made the corn beef and cabbage last night and it was really tasty. But now I have about a head and a half of cabbage left that I don't have the foggiest idea what to make with it. Any ideas?


Tuesday, April 08, 2008

Jon's Favorite Salsa Recipe

I promised a few people that I would post the recipe for the salsa stuff I like to make. I got this recipe from a girl I worked with at the Women's Research Institute at BYU-- it is SUPER easy. We usually eat it with lentils on the side. I just call it "Jon's Favorite Salsa" but you can name it whatever you like.

1 can black beans
1 can corn
1 can black eyed peas (I never put these in because I never have them)
1 green pepper, diced
1 onion, diced
2 avocados, diced
4 medium tomatoes, diced
1/2 cup Italian dressing
1/4 tsp garlic salt

Mix all the ingredients together. It is best if you let it sit for a few hours in the fridge, but you don't have to. Also, if you leave the pits of the avocados in the salsa the avocados won't turn brown (I don't know why this works but it does). It is really good if you eat it with lime flavored chips!